SonicDeath
Captain

Posts: 251
Registered: 7-7-2004
Member Is Offline
|
|
BHD Terrain making tut
Terrain Making Tut for BHD
by Sonicdeath
Tools needed:
-Photoshop
-bhd mod tools
-PFF utility
File format used for terrain making:
.tga -used for color maps and textures
.cpt -this is what the trngen builds
.tpj -runs the trngen
.raw -used to to make your height map
.trn -terrian information
Introduction:
Before I go on, you must have a good understanding of photoshop and the bhd mod tools in order to follow this tut.I also suggest you
make a working PFF so you can view your terrain as I'm not sure dropping files into your BHD folder will work for BHD.
First thing....forget about quad terrains.
Don't try this until you have a better understanding of terrain making.
Also, you can view all the sample files needed for terrain building in the bhd mod tools sample folder.
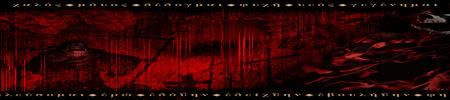
Height map:
you start off by making a 1024x1024 greyscale and using brushes paint a bumpmap like so:

save as a .raw file and name it something like yourterrain1_d.raw
Now...you have the beginnings of your height map
This next step is were many I believe give up while learning terrain making.
Make a folder and put it anywhere you like and name it yourterrian1
Now copy the Sample.TPJ which can be located in the sample folder in the BHD mod tools and put it in your yourterrian1
folder.
Now edit the Sample.TPJ file to reflect the location path of where your folder yourterrian1 is.
example path
terrainname "yourterrian1"
creator "you"
path "C:\BHD FILES\dfbhd_modtools_020304_xx\yourterrian1\" ;be sure to have a backwards slash at the end of path
depthmap "yourterrian1_d.raw"
output "yourterrian1"
lock_topleft 0 0
lock_topright 0 0
lock_bottomleft 0 0
lock_bottomright 0 0
-edit path and output as well and also terrain name and rename TPJ to yourterrian1
-Ok now you are ready to compile the .raw file in the BHD mod tools
running CPT:
Ok now you are ready to navigate to where your mod tools folder is located.
click the Tergen program in mod tools and open the yourterrian1.tpj

In upper right click build and away you go.....
If your path is set correctly in your TPJ than the build will start compiling the lods ( this will take a good while)
When it is completed you will now have a yourterrian1.CPT file in your yourterrian1 folder along with alot more .tml files which you can ignore
Colormap:
Well you have got this far to don't give up now.
Many people do color maps in programs such as terragen but I do mine the old fashion way in photoshop.
What I do is open the yourterrain1_d.raw in photoshop and use it as a base.
Convert it to a RBG color and start layering textures on top of that while overlaying each texture to get the right effect you desire.

Once you are happy with your colormap save as yourterrian1_c.tga and as a 1024x1024
Getting terrain in game:
Ok, this is where the .TRN file comes into play.
Open the sample folder in BHD mod tools and and copy and paste the sample.trn into your working yourterrain1 folder.
Rename sample.TRN file to yourterrain1.TRN
Below is a sample TRN and I will put yourterrain1 in the main things you have to edit in order to at least view your terrain in game
There are many things you can change concerning this file such as polytrn_detailmap, but in the interest of time I'm only going to cover the must
edits.
terrain_name "yourterrian1"
terrain_creator "you"
;terrain values
water_height 0 ;default, if zero will take from mission
polytrn_colormap yourterrian1_c.tga
polytrn_detailmap Detsand01.tga
polytrn_polydata yourterrian1.cpt
polytrn_tilestrip trntile10.tga
polytrn_charmap dvd3_m.pcx
polytrn_foliagemap dvd3_f.pcx
polytrn_sectorcount 8 ; width of sectors
polytrn_wrapx 1 ; do we wrap on X?
polytrn_wrapy 1 ; do we wrap on Y?
polytrn_origin -4 -4 ; move terrain origin by this amount (X,Y)
polytrn_sectors 4 2 4 2 4 2 4 2 ; width here must match above
polytrn_sectors 3 1 3 1 3 1 3 1
polytrn_sectors 4 2 4 2 4 2 4 2
polytrn_sectors 3 1 3 1 3 1 3 1
polytrn_sectors 4 2 4 2 4 2 4 2
polytrn_sectors 3 1 3 1 3 1 3 1
polytrn_sectors 4 2 4 2 4 2 4 2
polytrn_sectors 3 1 3 1 3 1 3 1
;lock_topleft 0 0
;lock_topright 1 1
;lock_bottomleft 0 0
;lock_bottomright 1 1
foliage
graphic mveg2b.3di ; the 3DI to place on the terrain - must be <=20 verts
color_lower 0 ; 0=match ground 1=50% blend 2=retain full color
color_upper 1 ; 0=match ground 1=50% blend 2=retain full color
match 254 ; match with up to four different colors in the foliagemap
end
foliage
graphic mveg2c.3di ; the 3DI to place on the terrain - must be <=20 verts
color_lower 0 ; 0=match ground 1=50% blend 2=retain full color
color_upper 1 ; 0=match ground 1=50% blend 2=retain full color
match 253 ; match with up to four different colors in the foliagemap
end
Ok, now you are ready to see what you have made. Hopefully at this point you either have a working PFF to put your terrains in or you can drop files
into your bhd dirictory although I'm not sure if you will be able to see them in med this way. You can drop file into the game directory for JO or DFX
but what I suggest is you make a working PFF so you can view skins, terrains and models in a more a more organized way.
Files you need in PFF
yourterrain1.TRN
yourterrain1.CPT
yourterrain1_C.TGA
Thats all folks. Go in med and start a map with your terrian.
BHD to JO or DFX tutorial coming soon.
|
|
|
kahuna
General
Posts: 544
Registered: 8-30-2004
Location: Nashville,Tennessee
Member Is Offline
Mood: u cant fix stup
|
|
Fine tutorial there M21 i tried it when i read at ur site and i failed so i'll leave it to the pros but its an awsome tutorial M21
|
|
|
SonicDeath
Captain
Posts: 251
Registered: 7-7-2004
Member Is Offline
|
|
Thank you
| Quote: | Originally posted by kahuna
Fine tutorial there M21 i tried it when i read at ur site and i failed so i'll leave it to the pros but its an awsome tutorial M21
|
Thanks bro. I'm gonna be trying to share knowledge as much as I can. One of the problems with the modding community is we are not shareing information
like we should.
|
|
|
Alucard-NGS-
Grunt
Posts: 7
Registered: 2-18-2006
Member Is Offline
|
|
Well great tut... im just still confused... on it tho, maybe if you got MSN, AIM, Yahoo, ICQ. You could help me more I am wanting to make some maps
for tunnle based missions for like DJ3 also know as VX, and just need some help.
|
|
|
Eagle_Eye
|
|
Here's the repost, with rehosted Pics
EE
--------------------------------------------
Terrain Making Tut for BHD
by Sonicdeath
Tools needed:
-Photoshop
-bhd mod tools
-PFF utility
File format used for terrain making:
.tga -used for color maps and textures
.cpt -this is what the trngen builds
.tpj -runs the trngen
.raw -used to to make your height map
.trn -terrian information
Introduction:
Before I go on, you must have a good understanding of photoshop and the bhd mod tools in order to follow this tut.I also suggest you
make a working PFF so you can view your terrain as I'm not sure dropping files into your BHD folder will work for BHD.
First thing....forget about quad terrains.
Don't try this until you have a better understanding of terrain making.
Also, you can view all the sample files needed for terrain building in the bhd mod tools sample folder.
Height map:
you start off by making a 1024x1024 greyscale and using brushes paint a bumpmap like so:

save as a .raw file and name it something like yourterrain1_d.raw
Now...you have the beginnings of your height map
This next step is were many I believe give up while learning terrain making.
Make a folder and put it anywhere you like and name it yourterrian1
Now copy the Sample.TPJ which can be located in the sample folder in the BHD mod tools and put it in your yourterrian1
folder.
Now edit the Sample.TPJ file to reflect the location path of where your folder yourterrian1 is.
example path
terrainname "yourterrian1"
creator "you"
path "C:\BHD FILES\dfbhd_modtools_020304_xx\yourterrian1\" ;be sure to have a backwards slash at the end of path
depthmap "yourterrian1_d.raw"
output "yourterrian1"
lock_topleft 0 0
lock_topright 0 0
lock_bottomleft 0 0
lock_bottomright 0 0
-edit path and output as well and also terrain name and rename TPJ to yourterrian1
-Ok now you are ready to compile the .raw file in the BHD mod tools
running CPT:
Ok now you are ready to navigate to where your mod tools folder is located.
click the Tergen program in mod tools and open the yourterrian1.tpj

In upper right click build and away you go.....
If your path is set correctly in your TPJ than the build will start compiling the lods ( this will take a good while)
When it is completed you will now have a yourterrian1.CPT file in your yourterrian1 folder along with alot more .tml files which you can ignore
Colormap:
Well you have got this far to don't give up now.
Many people do color maps in programs such as terragen but I do mine the old fashion way in photoshop.
What I do is open the yourterrain1_d.raw in photoshop and use it as a base.
Convert it to a RBG color and start layering textures on top of that while overlaying each texture to get the right effect you desire.

Once you are happy with your colormap save as yourterrian1_c.tga and as a 1024x1024
Getting terrain in game:
Ok, this is where the .TRN file comes into play.
Open the sample folder in BHD mod tools and and copy and paste the sample.trn into your working yourterrain1 folder.
Rename sample.TRN file to yourterrain1.TRN
Below is a sample TRN and I will put yourterrain1 in the main things you have to edit in order to at least view your terrain in game
There are many things you can change concerning this file such as polytrn_detailmap, but in the interest of time I'm only going to cover the must
edits.
terrain_name "yourterrian1"
terrain_creator "you"
;terrain values
water_height 0 ;default, if zero will take from mission
polytrn_colormap yourterrian1_c.tga
polytrn_detailmap Detsand01.tga
polytrn_polydata yourterrian1.cpt
polytrn_tilestrip trntile10.tga
polytrn_charmap dvd3_m.pcx
polytrn_foliagemap dvd3_f.pcx
polytrn_sectorcount 8 ; width of sectors
polytrn_wrapx 1 ; do we wrap on X?
polytrn_wrapy 1 ; do we wrap on Y?
polytrn_origin -4 -4 ; move terrain origin by this amount (X,Y)
polytrn_sectors 4 2 4 2 4 2 4 2 ; width here must match above
polytrn_sectors 3 1 3 1 3 1 3 1
polytrn_sectors 4 2 4 2 4 2 4 2
polytrn_sectors 3 1 3 1 3 1 3 1
polytrn_sectors 4 2 4 2 4 2 4 2
polytrn_sectors 3 1 3 1 3 1 3 1
polytrn_sectors 4 2 4 2 4 2 4 2
polytrn_sectors 3 1 3 1 3 1 3 1
;lock_topleft 0 0
;lock_topright 1 1
;lock_bottomleft 0 0
;lock_bottomright 1 1
foliage
graphic mveg2b.3di ; the 3DI to place on the terrain - must be <=20 verts
color_lower 0 ; 0=match ground 1=50% blend 2=retain full color
color_upper 1 ; 0=match ground 1=50% blend 2=retain full color
match 254 ; match with up to four different colors in the foliagemap
end
foliage
graphic mveg2c.3di ; the 3DI to place on the terrain - must be <=20 verts
color_lower 0 ; 0=match ground 1=50% blend 2=retain full color
color_upper 1 ; 0=match ground 1=50% blend 2=retain full color
match 253 ; match with up to four different colors in the foliagemap
end
Ok, now you are ready to see what you have made. Hopefully at this point you either have a working PFF to put your terrains in or you can drop files
into your bhd dirictory although I'm not sure if you will be able to see them in med this way. You can drop file into the game directory for JO or DFX
but what I suggest is you make a working PFF so you can view skins, terrains and models in a more a more organized way.
Files you need in PFF
yourterrain1.TRN
yourterrain1.CPT
yourterrain1_C.TGA
Thats all folks. Go in med and start a map with your terrian.
BHD to JO or DFX tutorial coming soon.
|
|
|
BuLL*
Private
Posts: 63
Registered: 4-15-2006
Member Is Offline
Mood: Slowly losing m
|
|
These sttings in the trn require altering.To match those in the tpj..
;lock_topleft 0 0
;lock_topright 1 1
;lock_bottomleft 0 0
;lock_bottomright 1 1
Otherwise with that heightmap layout the terrain will shear at the quad seams.
These settings should be used for that particular heightmap quad layout.
;lock_topleft 0 0
;lock_topright 0 0
;lock_bottomleft 0 0
;lock_bottomright 0 0
|
|
|
J.J
Grunt
Posts: 2
Registered: 2-5-2007
Location: Norway
Member Is Offline
|
|
need some help
i dont understand where and how to do this:
This next step is were many I believe give up while learning terrain making.
Make a folder and put it anywhere you like and name it yourterrian1
Now copy the Sample.TPJ which can be located in the sample folder in the BHD mod tools and put it in your yourterrian1
folder.
Now edit the Sample.TPJ file to reflect the location path of where your folder yourterrian1 is.
example path
terrainname "yourterrian1"
creator "you"
path "C:\BHD FILES\dfbhd_modtools_020304_xx\yourterrian1\" ;be sure to have a backwards slash at the end of path
depthmap "yourterrian1_d.raw"
output "yourterrian1"
lock_topleft 0 0
lock_topright 0 0
lock_bottomleft 0 0
lock_bottomright 0 0
-edit path and output as well and also terrain name and rename TPJ to yourterrian1
-Ok now you are ready to compile the .raw file in the BHD mod tools
hope some can help me did everything else but still get error cant open input file
if some can explain how please add me to ur msn or check out our website
http://uamod.complex-microcosm.com/
JJ
|
|
|
J.J
Grunt
Posts: 2
Registered: 2-5-2007
Location: Norway
Member Is Offline
|
|
well i got my terrain in to nile now.. but only in 2d nothing shows up in 3d
strange. and when i test map... theres no ground there...
some please help
|
|
|
Hells Bound
Private
Posts: 36
Registered: 2-1-2007
Member Is Offline
Mood: Good
|
|
Well i'v been looking or a BHD terrain tunt thanks guys

Im The Best  And The Worlds Allmost Over
Mwhahahahaha.
What The F*** Am I On.
Lmao. LoL. Dh'o. F*** |
|
|